Showing posts with label diy. Show all posts

Saturday, February 28, 2015

the 52 hand-lettered project.

I decided recently that I would participate in the 52 hand-lettered project on Instagram, as a challenge to myself. This year, I would really love to get my creative mojo back, and there really is no better way than to practice, practice, practice!

Armed with my gel ink pen (yep, that's it, really!), I am tackling this challenge head on!

Since I am starting late, here are weeks 1 through 7:


[ 1 | 52 ] my mantra for 2015
[ 2 | 52 ] summer love list
[ 3 | 52 ] one thing to do more often
[ 4 | 52 ] a summer memory
[ 5 | 52 ] places to visit
[ 6 | 52 ] a quote about love
[ 7 | 52 ] my everyday essentials

While I'm at it, I'm also hoping to up my photography game. I would love to be able to compose better images to share my work. I have discovered that my home has awful artificial lighting, and I tend to work at night, where that light is all I have.. so it has become a personal challenge to wake up earlier and take advantage of the soft morning light, or at least take photos in the afternoon when the sun is still shining.

Wednesday, February 25, 2015

my first commissioned work!

I recently had the opportunity to design a mug for my friend to gift to his girlfriend.

The verse he chose serves as a reminder of why she studies law (hint: because God is good!). It's such a sweet gesture  she's a lucky gal!


"Learn to do good; seek justice, correct oppression; bring justice to the fatherless, plead the widow's cause." Isaiah 1:17 (ESV)

The other side includes the verse reference.


So, friends, if you would like me to help you create something, please let me know! I love being creative, with a purpose.

Monday, August 11, 2014

updating the look of my phone.

I was itching to change something on my phone. I've had my phone for about a year and a half now, and other than changing the wallpaper, I haven't made many changes in a while.

When I first got my phone, I learned that there are many options to customize the phone. I used to be an iPhone gal, so this was *super* cool. I downloaded the first thing I saw, and I haven't changed much since that day (mostly because I was too lazy to set everything up again). But, like I said, I wanted to change something on my phone, and ohmygosh, I'm having a ball :D

Check it out! New launcher, icons and wallpaper.

    
The lock screen, and the default home page.

The pages on either side of the default home page. One has a clock, and the other my calendar.

I keep my screens pretty empty, and have frequently used apps in the dock (which scrolls and has 3 pages), leaving the rest in the app drawer. I like how clean it is, and it lets me see the wallpaper too! The wallpaper reminds me of the verse, "Be still and know that I am God. I will be exalted among the nations, I will be exalted in the earth." (Psalm 46:10) But it's also just a really pretty background :)

I used to use Atom launcher, but Apex has way more functionality. I much prefer it. It feels much less cumbersome. Yippee! A+

Launcher: Apex // Icon Pack: Numix Circle // Wallpaper: Julie Song for designlovefest

Monday, September 17, 2012

DIY: the creative process.

I recently did a few paintings and I wanted to share with you the creative process I take to get there. I'll use this painting as an example.


First, to get inspiration, I look everyone on the internet. I got the ideas for this particular project on pinterest, and from the facebook page of one of my favourite blogs, a cup of jo.


Once I figured out what I wanted to create, I made a plan. What did I think my final project would look like?


As you can tell, my plan looks a little different from my final product. First of all, I didn't recreate the different coloured painting effect in my plan (just wasn't worth the effort), but also my quote ended up being too long for my canvas, which was a-okay! It's better this way.. less words, therefore simpler! And we all know what a big fan I am of simple!

This is generally how I create most of my crafts. I start with a concept, pulled from inspiration from the internet. Then I create a plan.. and hope for the best! Sometimes it's better to stick to a craft with great instructions, but when you create something of your own... well you can truly call it your own.

I guess the biggest thing I learned from this was to have a plan so I know which direction I'm heading, but to be willing to change the plan if need be. Be prepared, but be flexible!

Happy crafting!

Monday, September 10, 2012

DIY: revealed quote painting

It was raining over the weekend, so I painted 2 different paintings (check out the first one I did!).


This painting is very simple in concept, but a little longer in terms of steps. First take your colours (whichever colours you'd like.. I chose green, blue and grey) and paint them along your canvas, covering the surface. I left some of the canvas exposed.


Using removeable vinyl letters, place your words on the canvas. I put them onto a piece of painter's tape first, so I could arrange the letters before placing them on the canvas. This worked out well for me since the word 'Everything' was a little longer than I had expected. Having the flexibility of moving the letters was very helpful.


I removed the tape, and put the letters right on the canvas, exactly where I wanted the words to show up, and taped a herringbone pattern on the canvas as well.


Using white, I painted over everything, making sure no edges were lifting up, covering the entire canvas!


Lift up the tape and the vinyl letters to reveal the final product. Wow!


Here are the two paintings I did. It only took me a morning, not very long at all. I hope you enjoyed following the process! Painting was a lot of fun.

Saturday, September 08, 2012

DIY: geometric art

For my 19th birthday, Rosemarie got me the BEST PRESENT EVERRRR. She gave me all the materials I needed for something I pinned on pinterest: canvas, paint, tape, brushes.. all of it. Makes my life so easy! {I am now 20, so she gave this to me not this past summer, but two summers ago..!} I pin lots of craft projects on Pinterest, with the best intentions. They are there as inspiration for an art project that I will attempt.. some time.. in the near far future. I just finished doing two of the simplest paintings ever, using 2 of the 4 canvasses Rosemarie gave me (I will show you the first now, the other later). Man, I'm slow! Anyway, onto the art.


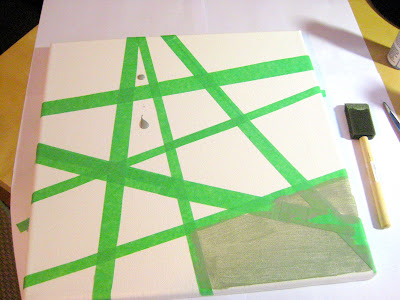
This painting was super simple, and doesn't require many steps. It is simply this. First, cut thin strips of tape, and tape them across your canvas all over the place. Start with one paint colour and paint some areas. I used grey as an accent colour (much like the original pin), so I only painted a few of the shapes grey.


Paint the rest of it a different colour (blue blue blue!)


...and peel the tape! This is the funnest part!


Wasn't that simple? Rose gave me all that I needed and it took me this long to do. Um, I fail.

Tuesday, August 28, 2012

a birthday scavenger hunt.

I planned a scavenger hunt for my birthday event this year. I hesitate to say party. I just never have the time, or energy to plan a party at the end of the summer, not to mention most of my friends are always either off travelling or back to school already.. and often that would be me, not them. So more of a get-together. Anywho, I totally went off on a tangent there.

You could organize a scavenger hunt for just about anything, it doesn't have to be for a birthday!! Mine wasn't even birthday themed, I just used my birthday as an excuse to get my friends together, hah!

Here's what I put on my invite:
It's a scavenger hunt, plus cake!

At 7 o'clock, on Saturday August 25th, you will find me "occupying" a spot between the arts and the brains of the city (un hôtel, of sorts). You will find me at a fountain across the street from a Starbucks.
I was really really excited for cake. I live for cake, pretty much.


Because my group was so small (I'm telling ya, nobody is around at the end of August, ever!), we just did a one-group scavenger hunt. Which means I just tagged along and once they solved a clue, I handed them the next one.

Here are all the clues. Can you solve them?
Let’s go shopping!

1. Take a photo of something that has the name of one of your group members on it.
2. How many different Robert Munsch books are currently being sold at Chapters (i.e. different titles)?
3. What are the two cheapest kinds of beavertails, and how much do they cost?

Sizzle sizzle sizzle. Who lit this Ottawa icon, which sits on a hill?

Find the phone number of a payphone booth. What is the last digit? If you number is even, add 1.
If I stood under a spider and looked south, what would I see? (Hint: I am green) How many vowels are there?
Subtract the smaller number from the larger number, and find this number of pennies.

This one’s easy.
☐ Take a group photo on a long set of stairs.
☐ Take a photo, imitating a statue.
☐ Take an artsy photo (get creative!).
..and I will give you your next clue.

This restaurant is your final stop. It is a place where I like to reminisce. Let’s all head there to enjoy a slice of cake, or two! I hear their pies are also divine! Still don’t know where you’re going? Singing this song might help..
All alone in the moonlight
I can smile at the old days
I was beautiful then
I remember the time I knew what happiness was
Answers and pictures, after the break.

Thursday, July 26, 2012

the reverse braid.

Have you ever heard of the reverse braid (or inside-out french braid or dutch braid)?

This summer I have become a little obsessed with braids. This obsession probably started at the end of high school but I didn't start trying new braids until more recently.

I have now mastered the french braid, which is awesome! It's definitely my go-to braid. I put my hair in a single braid, off to the side when I study, bike, snowboard, and pretty much whenever I want to get my hair out of the way. The only difficulty is that my hair is layered, so the shorter layers come out very easily.

I recently discovered the reverse braid which at first confused me. But it's really a very straightforward concept. It's a french braid.. but backwards!! It was explained to me as showing more of the braid, since in the french braid you tuck everything into itself, and hide the braid. But in the reverse french braid, all the hair goes on the outside so you show off the braid. It's useful when you want a fat voluminous braid (hehe).


See? The braid is on the outside!

It's simple, really. Braid normally, but when you take the side piece and cross it over the middle, cross it under instead. Ta-da! That was easy. Or see this great video tutorial. I'm going to keep practicing this so I can do more cool hairstyles with it. And there are so many ideas with braids on pinterest!


Ultimate goal: this swirly updo.


The waterfall braid... one day.


To the side, with a bun.


A braid within the braid (oops, I let out the secret).

To learn next: the fishtail braid.

(images from pinterest, and thebeautydepartment)

Friday, July 20, 2012

canada day cake.

Both Canada and the United States celebrate their national holidays over the same weekend, with Canada Day falling on July 1st, and Independence Day or the fourth of July being on, well, July 4th. There is a wealth of patriotic American themed crafts, prints, food, etc. but very little Canadian content!!


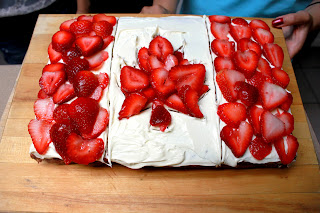
And so, here is a long overdue Canada Day cake. Red velvet, creamcheese frosting and strawberries. Mmm mmm, good!


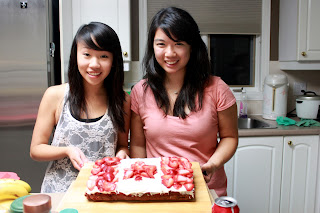
I kept forgetting to post this (I blame Bluesfest), but here it is at long last! When my friends came up that Canada Day weekend, we made this cake to celebrate.


Happy (waaaay belated) Canada Day!

Wednesday, June 13, 2012

DIY: decorated phone case.

I got a new phone a while ago, and tried looking far and wide for a phone case that was at the same time protective, durable, pretty and affordable. But apparently, no such case exists for the iPhone 3 because it is so old.

My best options became a white hard case, or a black hard case. They were a little plain for my liking, so I got the white case and made a promise to myself that I would decorate it.. and that I did!


The hardest part was deciding how to decorate it. Many ideas later, I decided to copy this onto my phone, in mini version.

Materials: phone case, coloured nail polish, makeup sponge (or paper towel, or any other sponge), clear nail polish, tape, scissors.

I cut my tape into thin strips (though I would probably do thinner if I were to do this again, simply because the "canvas" is smaller than most) and arranged them in any kind of interlinked pattern.

I experimented with the painting process, and found that what worked best was to paint the coloured nail polish onto the tape, and then dab at it with the makeup sponge to spread it around the body of the case. If you put the colour right onto the case and then dab it, the spot where you originally put the nail polish will be a lighter coloured spot.


The case dries really quickly, since there is actually really little nail polish on it. Once it's dry, remove the tape and repeat the same process with the clear nail polish. I painted the nail polish straight onto the sponge and dabbed it all over the case. (Note: if your case, like mine, separates into two parts, take the case apart before painting the edges that would connect or else you might accidentally glue your case together)


Easy, beautiful, and done!

Saturday, June 02, 2012

double the belts, double the fun!

In high school, I had a biology teacher who would tell us that tests were "double sided, for double the fun!" and it has stuck. I love the saying, and use it all the time.

Recently, I bought 3 belts from H&M, and the colours are so cute together! I wanted to put them together, so I thought why not wear two of them interlinked?


Two belts become one?

Ummm, I don't normally ask people to look at my belt/crotch area. Strange. But here's a picture of myself wearing the belts (selfie alert!)


Note to self: Don't do fashion posts in the future, but if I do, don't use myself to model. Hah. #awkwardselfie

Would you do it?

Wednesday, December 14, 2011

simple scarf to circle scarf.

I have wanted a circle scarf for a long time, since they are very easy to wear, and so fashionable right now. But I didn't want to buy a new scarf when I already have so many good scarves at home! So I turned one of my favourite scarves into a circle scarf, and I wear it like that all the time. It's been a good month or so now, and I didn't think it was anything special, but two different people asked me about my scarf today, and Chelsea suggested I write about it, and share it. So I thought, why not! It's super simple.. and I love wearing my scarf this way.

Here I am, wearing my scarf.


It's simple, really! Take two opposite corners (top-right, and bottom-left; or top-left, and bottom-right) of the scarf, and tie in a knot. There you have it! A circle scarf! Depending on how long your scarf is, you will be able to wrap it around once, twice, or maybe even three times.

Monday, December 05, 2011

DIY: paper napkin wreath.

For my 4th day of my Christmas Countdown, I made a paper napkin wreath. It was super simple to make, and used all materials I already had on hand! I had lots of leftover napkins from my flower tree earlier this year.

There were no tutorials online that I liked, so I made my own very simple wreath.

First I taped some pieces of paper together to create a base, and I drew a large circle and a smaller circle to create the shape of my wreath. I just drew them freehand because it isn't important how perfect the circles are since the napkins will stick out every which way anyway.

I cut off the corners of my paper, but left the middle in because the door I was putting my wreath on is also white. But if your door isn't, you might want to cut out the middle part.

I then grabbed a napkin and bunched it up from the middle, and taped it to the wreath with the bunched part facing the inner circle. I continued this and filled the entire wreath. I did two layers to give the wreath more depth.

To hide the taped up bunched bits, I took a napkin and rolled it into a donut shape and taped it on top of all the exposed parts.

And ta-da! A wreath! It's pretty lightweight, so I just taped it to my door, and it is holding fine. Otherwise you could hang it like any other wreath too.

Wednesday, October 12, 2011

DIY: organizing my keys.

To be honest, I don't know why I did this.. only because it is a very simple solution, I guess? I already have my own method of organizing my keys and I never mix my keys up, but since I saw this on pinterest, and it's as simple as taking out a bottle of nail polish and painting my keys.. I went ahead and did it anyway.

This would be super and a bit of a money saver if you like to buy those rubber key labelers. Especially if, like me, you already have a whole lot of nail polish around anyway!


EDIT: It just occurred to me.. I can now change the colours whenever I feel like it! One point for nail polish remover!


Sunday, October 02, 2011

nail painting

I love love love painting my nails. I used to hate it cause nail polish made my nails feel like they were suffocating, but now if I don't have nail polish on, I feel like my nails are naked! Funny how that works!


Last night, I tried galaxy nails, which are actually super simple. Instructions from A Cup of Jo (an amazing blog, btw! She shares amazing things everyday, love it!)

1. Get a dark blue nail polish for the base, plus a few lighter sparkly polishes (for stars and comets!).
2. Paint the dark blue on all your nails as the base layer.
3. Now layer the glittery colors over the dark blue, but over only parts of each nail. A swipe here, a dab there. Mix things up with each nail, since you want them all to look different.
4. Layer a lot, since, instead of your nails looking flat, you want to get that 3-dimensional look of a far-away galaxy, like you're gazing up at the night sky.

I saw them a while ago on her blog, but finally had a chance to try it now. Here are the colours I used.. all my purples and blues. It doesn't really matter what you use, as long as they look like night sky colours.


A tip though: You need one colour/brush that you are willing to use to swirl the colours a little and mix things up. I used my sparkly blue one to pull everything together and add sparkles to my nails. The brush ended up being a little goopy, so I washed it with nail polish remover after using it. No bigs.

Last week I did coloured tips for my nails. I love that the new normal, is doing something different. This style is essentially a french manicure, using colours other than white though. I used blue, coral, purple, yellow and sparkles.


A few quick tips:
1. To make a straight line, use scotch tape to cover all of your nail except the tip you want to paint.
2. If you want to accent a nail (as I did with the sparkles), accent your ring finger.

And there you have it! Don't forget to moisturize your fingers, they get mighty dry especially with the use of nail polish remover.

Sunday, September 18, 2011

cake plate.

I love the easy DIYs that exist in life. I do so many easy DIYs in life, that I'm sometimes ashamed to call myself a DIYer. Does it really count, if all you did was buy materials and put it together? There was no creativity involved! But I guess you can say that about all crafts.. you simply "buy the parts and put it together".

I made a cake plate to put Henrietta's cake on. I don't know if it qualifies as a true DIY, but it sure is cheaper (and easier to find) than a real cake plate! The good news is that you can use whatever materials at all. It really doesn't matter!


All you need is something for the stand, and something to hold the cake. I used a cup for the stand, and a tray for the cake. You can use anything from a candleholder, to a wine goblet, to a cup for the stand. And you can use trays, bowls, plates, or whatever shape and size of dish that pleases you for the top.

It's seriously the easiest thing in the world.

Cake Plate

Materials:
● Cup/candlestick holder/wine glass for stand
● Plate/bowl/tray
● Super glue/epoxy

1. Grab your two pieces, apply glue to one side and attach in the middle of your dish! Ta-da! Was that not the easiest thing in the world?

You can even make it multi-tiered for a cupcake stand if you want! If you were feeling extra crafty, you could spraypaint your entire creation to create a more unified look. I left my spraypaint at home in Ottawa, but it would really make for a nice touch to paint the cake plate.

Thursday, September 15, 2011

DIY: jewellery organizer

One of my big goals this summer was to either fork up the money to buy a cute and functional jewellery organizer, or just make one myself. All the ones I had seen in shops cost upwards of $30, and the ones I had seen online required tools I did not own, or were way too complicated and time consuming. I knew I had to find the easiest craft possible.. and it was an endless hunt.

It wasn't until this summer when I was in Saint John, at a cute little craft/jewellery market and I saw one of the ladies selling her earrings off a kitchen tray with a drawer liner instead of the actual tray part. It was so cute! Anyway, I kind of had an idea for what I wanted to make for the longest time, but I didn't know what to use as a backing (I'm thinking that this will make more sense once I post pictures). Everything I had read online said to use chicken wire, but I thought that was ridiculous! The holes are huuuuge!! How does that make any sense?!

Anyway I finally figured out a cheap organizer for earrings and necklaces. It's a two part thing but only cost me $5 for the necklace organizer, and about $15 for the earring organizer. I definitely didn't put much time into frame shopping, but you can definitely find a cheap frame somewhere (Salvation Army?) to use instead.


Jewellery Organizer

Materials
Earring Organizer:
● Frame
● Drawer liner
● Tape/staples/glue

Necklace Organizer:
Rail
S-hooks

Instructions
Earring Organizer:
  1. Take the frame, and place on drawer liner to measure size of liner. Since I taped the liner to the mat that was provided with my frame, I made the liner about an inch wider than the hole in the mat, on each side. If you are stapling or gluing the liner to the frame, then I would suggest only leaving about half an inch extra on each side.
  2. Attach the liner to the inside of the frame. Make sure you hide the edges so that they aren't sticking out.
  3. Hang/prop up the frame. You can either hang the frame to the wall (I did this to save space in my room, I don't have that much table top space, and this is definitely a big space saver for me.. my earrings used to take up a good half of my dresser top!), or you can also put it on a stand and display it proudly that way too. If you prop it up, then you can also use the organizer for studs. Right now my studs are in a box on my dresser, but they take up a lot less space than if all my hanging earrings were there too.
Necklace Organizer:
  1. Attach rail to wall, and hang hooks Um, that's it. Seriously. It's so simple. My initial idea was to put this on top of my frame to create a curtain effect, but I decided against this to avoid clutter. But seriously, this is so simple and you can hang all sorts of things off the hooks, and the rail. I currently have purses hanging neck to my necklaces right now.
This whole project was so simple, cost me about $20, is way more functional than anything I've seen in stores, and it took me under 30 minutes to complete.

I have this set up in my apartment in Kingston, and I might just have to get one up in my home in Ottawa too! I am so proud of this creation, and I will definitely be showing it off to all my friends who visit me!

Here's the final product:


Saturday, August 13, 2011

napkins and tiles and paint, oh my!

You've seen the napkin flower I made last week. On the same night I also painted some tiles to make easy coasters. They are really pretty. If it all works out well, I'm thinking of buying a larger tile and making a big serving coaster to match too!


The napkin flowers were super easy to make. Essentially you take a stack of napkins (I used 4 large ones, and 1 small one, but it doesn't really matter how many you use), fold them into an accordion, attach them, cut them, and open them. If that makes no sense to you, here's the full tutorial.

My coasters on the other hand, I thought would be easy.. until I decided to start making things up as I went. I only did my research after doing the craft (a little backwards thinking, I'd say). I hopped my way over to Home Depot to find some reasonable sized tiles, and bought 3 white tiles for 31 cents each (1 for each girl I'm living with, though come to think of it, 4 would have made more sense, in case of guests or just as extra. But whatever!). The tiles were very cheap, and I had to find something to put on the bottom so I bought felt pads which are way overpriced. I should have just bought a sheet of felt at Michael's and it would have been cheaper.. and Michael's isn't cheap! Research before you buy, my friends. I also wasn't sure if my paint would stick or not.. and didn't sand my tiles or anything, and had not thought to buy anything to seal it. But I did decide to invest in a $5 bottle of clear spray paint at Wal-Mart the next day. I hope it proves to be a good buy. You can do so much with spray paint! I also bought a primer and a lovely royal purple shade. How many things can I update by simply spray painting? I may also go thrift store shopping now, hehe!


This is me mixing the glue in the water (and then paint). The typography nerd in me giggled a little (okay, a lot).

The ampersand is my favourite character.. fun fact!


Easy DIY Painted Coasters


● Tiles
● Paint (I just used plain ol' craft paint I have at home)
● Water
● Craft Glue
Clear Spraypaint (to seal in your paint)
● Felt pads, or pieces of felt and double sided tape/glue
● Q-tips (optional, for cleaning)

1. Lay out your tiles however you want to paint them.
I wanted to do a chevron pattern that would continue from one tile to another so I put them side by side and drew a slight outline using washable yellow marker.
2. Mix the paint using 1 part water, 1 part glue and 2 parts paint.
I was looking for a wet watercolour looking paint but wanted it to have a thicker papier machier consistency.. I also made this part up and don't know if it changed my result at all, but I like how it turned out. To my craftier friends, any thoughts? Does water and glue help? Or hinder?
3. Paint your design and allow to dry overnight.
I always allow things to dry overnight, I always want to make sure things are very dry before handling them, just in case.
4. Clean up messy lines.
Because I used washable craft paint, it was very easy to wipe off paint, and straighten my lines using a Q-tip and water.
5. Spray paint your tiles to seal in the colour.
Do this outside!! Never spray paint inside. I recommend you get a good rag out, or do it on the grass.
6. Once dry, attach felt pieces to the bottom of the tiles to protect your table from scratchy coasters. And you're done! Easy peasy.

Let's hope the paint doesn't scratch off too quickly! And if it does, I can redesign and reuse! How fun!